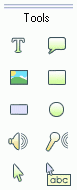
Use the Side Toolbar to insert a new object into the currently edited slide. There are 10 main Side Toolbar buttons under the Tools group.
![]() Insert a Text
Insert a Text
To insert a text object.
![]() Insert a Callout
Insert a Callout
To insert a callout object.
![]() Insert an Image
Insert an Image
To insert an image object. The supported image files are JPEG, BMP, GIF and TIFF.
![]() Insert a Rectangle
Insert a Rectangle
To insert a rectangle object.
![]() Insert a Rectangular Highlight
Insert a Rectangular Highlight
To insert a rectangular highlight object. This transparent rectangle is useful for highlighting an area on the slide.
![]() Insert a Circle
Insert a Circle
To insert a circle object.
![]() Insert a Sound
Insert a Sound
To insert a sound file. The supported sound files are MP3 and WAV.
![]() Insert a Recorded Voice
Insert a Recorded Voice
To insert a recorded voice from a microphone.
![]() Show/Hide a mouse cursor
Show/Hide a mouse cursor
To show/hide a mouse cursor in this slide.
![]() Insert a Text Rollover
Insert a Text Rollover
To insert a text rollover object. A text rollover is an invisible area which will show a text on a mouse over.
All of these features and another additional features are also available from the Insert menu.
The following example shows how to add a text by clicking the Insert Text button.

The newly created text object is now visible in both the Preview window and the Timeline. In the Preview window, the text object has a blue selection rectangle and a resize and rotate handle. Drag the resize handle horizontally to resize the text area. Drag the rotate handle to rotate the object. Holding a shift button while rotating the object will rotate the object with 15 degrees increment. To move the object, simple drag the text area.
In the Timeline, there is a text object bar showing the duration of 3.00 seconds. Each object in the timeline has a Show time and an Exit time. A show time is the time when the object starts showing/playing and an Exit time is the time the object disappears/stops playing. In this example, the new text object will show at second 0 and will be disappeared in 3seconds after the starting show.
The presentation can be played by clicking the Play button at the top of the Preview window or by pressing the Ctrl + 1 button. For example, let us change the show time into 1second by dragging the start of the object bar. Notice that the duration changes while you are dragging the object bar. Also, change the exit time into second 2 by dragging the end of the object bar. Then, play the presentation again and notice that now the text will show at second 1 and will be disappeared at second 2.
Timeline ruler is located at the top of the timeline. A red vertical bar within this ruler indicates the end of the slide. Drag this bar to adjust the slide duration. Note that you cannot make the slide duration less than the latest object Exit time. Next to the vertical bar is a Slide Play/Pause icon. When the ![]() icon is showing, the current slide will jump to the next slide at the end of its duration. Click this icon to make the slide paused at the end of its duration and vice versa.
icon is showing, the current slide will jump to the next slide at the end of its duration. Click this icon to make the slide paused at the end of its duration and vice versa.
You can get more controls over a slide timing via the Slide Properties window. Click the ![]() button at the Side Toolbar to open the following window.
button at the Side Toolbar to open the following window.
![]()
Double click the object in Preview window to open a property window. You can also do this by double clicking the object bar in the Timeline.

A text property window will show up. In this window, you can choose the text font, the size, the transparency, the color, etc. You can also manually enter the text Show time and the duration here. This window provides more controls over the object timing. In addition to that, you can make the object to show forever in this Timeline menu. It means that an object will be appeared until the slide is terminated. If the slide is set to pause at the end of its duration, the object will stay visible. Click the Show For button and select the Show Forever to make the object appeared forever.
Another Flash Demo Builder unique feature is the ability to execute an action when an object is clicked. The types of the action to perform are: Goto a website, Play slide, Pause slide, Go to a slide and Send Email. These actions are very useful features to provide interactivity in your presentation.
Click the OK button to apply the changes and close this window.